Paleomagnetic Sample Collection
Paleomagnetic analysis of varves requires the collection of oriented samples. The sediment should also be fine-grained with a high silt and clay content and a minimum of sand. Paleomagnetic samples can be in the form of cores that are used for other analyses or they could be outcrop samples specifically collected for paleomagnetic measurements. Core sampling must be with a technique that does not disturb magnetic signals during coring and also preserves the orientation of the core. In particular, paleomagnetic remanence directions may be reoriented or attenuated during coring if the coring technique deforms the sediment or shocks the sediment by imposing changes in pore pressure. If you intend to collect cores for paleomagnetic analysis you should make sure that your coring technique will accommodate core orientation and does not disturb the sediment in such a way as to ruin paleomagnetic signals. Of the coring techniques that have been used at Tufts to recover subsurface and outcrop varve sections, hollow-stem auger sampling is known to disturb magnetic signals in cores as is evident from noticeable core deformation and test runs of cores in a long core magnetometer that yielded scrambled results. The jury is still out on the hammering of PVC pipe at outcrops, which is suspected of causing shock deformation only in cases where the sediment is very moist. If you are sampling an outcrop it is always safer to take oriented block samples as described below, which are more easily and accurately oriented.
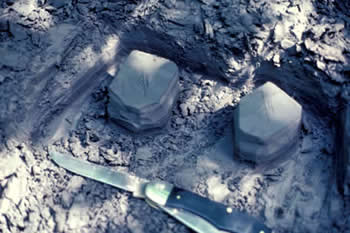
Collecting Oriented Sediment Blocks at an Outcrop
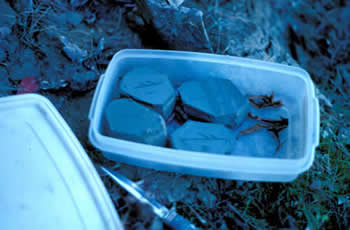
The collection of oriented blocks of sediment from an outcrop is the safest way to collect samples with undisturbed paleomagnetic signals. This involves trimming samples at the outcrop into blocks as shown below. An orientation arrow (geographic north) is scribed on the top of the block as well as an abbreviation of the sampling horizon. The exact position of sampled horizons can be recorded as a distance below the top of a core collected at the outcrop. Cores are used to formulate a varve record for the outcrop or to match to an existing varve record for the outcrop or area (see Outcrop Core Collection page). After blocks have been scribed with an orientation arrow they are removed from the outcrop and stored in air tight plastic food storage bins for transport to a lab. Resting them on leaves or sand in the box will prevent them from adhering to the plastic during transport. Blocks are typically about 5 cm in diameter and 5 cm thick, large enough to easily be trimmed to an appropriate size for a magnetometer.
It is recommended to collect at least 2 samples from each of 6 horizons within a varve sequence spanning about 20 years. This should categorize the paleomagnetic characteristics of that interval. Alternatively, if varves are thin, and each sample will have at least 2 full varves, collecting 3 samples from 4 horizons each will also provide meaningful results. This will give you enough measurements and horizons for statistical treatment of your results. Clusters of samples should then be taken about every 50 years to record secular variations in the varve section. If the sediment is soft and wet, and you are worried about sediment deformation during transport, the samples can be prepared for analysis in the field as described below for a lab.
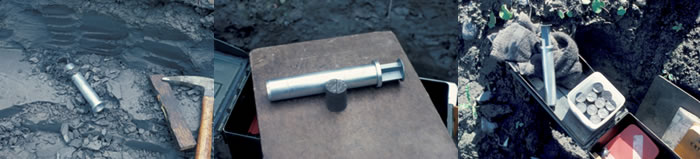
In earlier studies (1980-1985) a different sampling technique was used that was able to provide samples of a slightly larger volume, eliminated the use of plastic tubing, and was quicker than the tube technique. This sampling technique worked well in the western Mohawk Valley of New York where most of the varves being studied were relatively dry and also compressed due to deep burial in sections above the water table or had been overridden by glacial ice after deposition. In this technique, developed by Bill Brennan at SUNY at Geneseo, a sharpened, thin-walled brass or aluminum tube of 1-inch (2.54 cm) ID, which has been greased along its inside with Vaseline, is hammered into a bedding plane about 3 cm. An orientation arrow must be scribed on the bedding plane before coring.
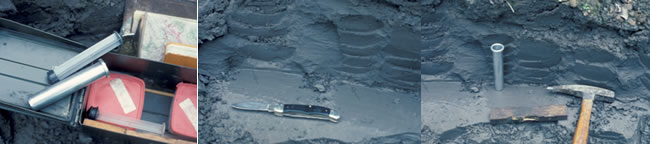
The sampler is then dug out of the outcrop with its enclosed sample. The sample is removed by forcing a rubber plunger in the upper end of the tube, creating air pressure that backs the sample out of the lower, greased end. The rubber plunger for a 1-inch tube is from a large syringe used by veterinarians to give injections to farm animals. You can usually beg for one of these from a vet with a minimal cost. The extruded sample can then be trimmed and immediately analyzed if it is coherent or it can be trimmed and then sprayed or painted with quick-drying polyurethane or clear Krylon to preserve its moisture for a short time. Samples of this type, even when they are very hard at the start and are painted, do not last very long as coherent specimens and will eventually crack. We have not been able to find any evidence of magnetic signals being altered by this technique when the sediment is not wet and soft.
Sample Preparation
After returning from the field with block samples, they must be preserved in such a way as to prevent rapid drying and also to prevent disaggregation while being spun in the magnetic devices. Samples should be trimmed with a razor knife to fit into 1-inch OD styrene plastic tubes cut to a length of no more than 1 inch (2.54 cm). The tubing should be thin-walled with something like a 7/8-inch (2.22 cm) ID. This tubing usually comes in 8-ft sections, is easily cut into 1-inch lengths using a ban saw, and is cheap. Before preparing samples you should check on the types of sample sizes and shapes that can be measured in the paleomagnetic equipment you are using. We have a Molspin Minispin magnetometer and Minisep anisotropy of susceptibility device that will receive 1-inch cylinders. The optimum sample shape inside the plastic cylinder for our devices is a sample length that is 90% of the sample diameter. With a sample diameter of 7/8 inch (inside ID of plastic tube, 2.22 cm) the sample length will be about 25/32 inch (2.0 cm).
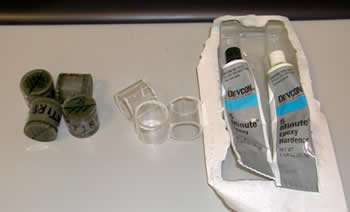
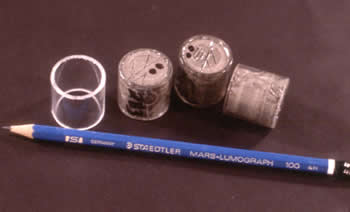
Trimming samples can be done relatively fast by first scribing the top of samples with the outline of the inside diameter of the plastic tubing. This can be done by lightly tapping a sharpened plastic tube (outside edge beveled) on the top of the sample to make an outline. With practice you can learn to trim samples so that the plastic tubing slides over the sample snuggly but does not require extreme force and sample deformation to place it into position. You should then trim the bottom of the sample so the sample has the correct length. When the top of the sample is in position, about 2-3 mm short of the top of the tube, you can seal the top with 5-minute epoxy. When the top has hardened the sample bottoms can be sealed. Orientation arrows are easily seen through the epoxy under a bright light and can be traced with a permanent marker on the surface of the hardened epoxy. Epoxying samples in batches makes mixing the epoxy easier and less wasteful.
When using this method of sample collection and preparation it has been possible for a group of 12 samples (6 horizons) to have very tight clustering with α95 values consistently at 1-3�.